Basement Reno 4: An Ode to Dricore
No, I'm not writing a poem.
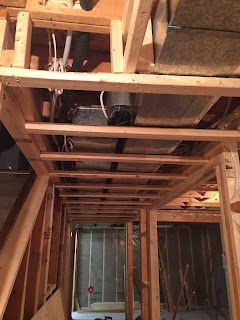
Other than drywall, nothing makes a renovated space feel as close to being complete as laying down flooring, and a first step towards this is Dricore! (http://www.dricore.com/en/index.aspx) Dricore is subflooring that is wonderful because it's fairly easy to install and provides cushioning and water protection for the flooring itself. But, I'm getting ahead of myself. The last blog I did about the basement was tearing down the walls, and nothing about building them back up! So, here are some snapshots of the bulkheads we built as well as some more work.

Bulk head over the eventual bar!
This part of the room will have a drop ceiling but we're going to drywall the bulkhead we built around this venting
In order to put in my glorious tub, we needed to move the plumbing (and by we, I mean Rob and his dad - I was building the bulkheads!)
Ruger, the ass, somehow got downstairs and stepped right in the concrete as it was curing and now he's made his mark on the floor forever!
All these inside-the-walls things took MONTHS (mainly because we also have lives and the city flooded the basement which delayed us over a month) but finally this past weekend we put down the Dricore!
Tools:
- Music selection (we chose Contemporary Blues this time around)
- Hammers
- Black shims
- Wooden shims
- some 2x4s about 2 feet long
How to install it:
1. Carry it all downstairs
2. Place your first piece in the corner and shim it to make it even against both walls.
3. Dricore is tongue and groove, so you just slide the next piece into the first, shimming as you go. To make sure the new piece is flush with its sibling, you need to hit it with a hammer. But NOT on the Dricore itself! You need a buffer between so you don't damage the tongues. Put a 2x4 against the new piece and hit that (while standing on said 2x4). You may need to do it a couple times on both sides to even it up.
4. If your floor isn't 100% level, you can use these handy black shims to make the Dricore rest more level (generally placing it between two pieces).
And if your floor is proper f*cked, like ours, you can install the Dricore to the best of your ability, then tapcon the pieces to the ground to assist in keeping it level until gravity and time do that for you. That was my job while Rob was cutting the tricky pieces. To tapcon Dricore: 1. Use a 5/8th bit to drill maybe 10mm into the top of the Dricore. Then pre-drill a hole through the Dricore into the cement. Then use an impact driver to insert the tapcon itself. Not as easy as it sounds. Especially if you break a bit and have to endure a lecture.
5. Dricore can get tricky if you have to stall it around posts but just be patient and make sure it's level!
7. Order some pizza when you're done and enjoy the look of being NEARLY THERE!
Denny was shocked at the difference!
The Dricore took us a couple full days to install - don't assume it's like throwing down that plastic crap, but using it makes a big difference, especially if you're forking out dollars for some nice flooring. I believe the Dricore cost us around $1200 for the entire stack (and we used every peice) and that's with a 15% deal at Lowe's. But, if our basement floods again, it should help prevent damage. Plus, it cushions the floor nicely so the laminate we've ordered should go on pretty nicely. And it'll help keep the floor warmer in the winter.
Tips:
- Unless you have an insane # of cuts, Dricore really is only a 2-person job because you have to do it in sequence. Don't get too many cooks in the kitchen
- Hit the hammer in the center of the 2x4 to prevent damage to the tongues
- Still wear good boots but you don't really need glasses and gloves
Next Steps: - Drywallers do their thing (so, expect a blog post in about 2 weeks for some before and after photos, as well as my exciting treatise [aka excuse] on why we hired drywallers instead of doing the work ourselves. Spoiler alert: time)
- Tina to decide on a wallpaper for the accent walls and paint for the other walls/bathroom
- Rob to agree with Tina's decisions
- Tina to find and finally purchase a freakin chandelier for the bathroom
- Tina takes a couple days off work to prime and paint! (expect a blog post for that!)
- Rob to finish building the bartop
- Tina and Rob to find the underside of the bar and/or build it (a blog for the bar itself)
- Install the lights (also for me to blog pictures of said lights)
- Tile the bathroom floor/accent wall/place where the fireplace is going (blog)
- Install the laminate (blog)
- Install Baseboards
- Put the bar, pew games table, furniture, fireplace, and lights up (final blog)
- Host New Years! :)
Other than drywall, nothing makes a renovated space feel as close to being complete as laying down flooring, and a first step towards this is Dricore! (http://www.dricore.com/en/index.aspx) Dricore is subflooring that is wonderful because it's fairly easy to install and provides cushioning and water protection for the flooring itself. But, I'm getting ahead of myself. The last blog I did about the basement was tearing down the walls, and nothing about building them back up! So, here are some snapshots of the bulkheads we built as well as some more work.

Bulk head over the eventual bar!
This part of the room will have a drop ceiling but we're going to drywall the bulkhead we built around this venting
In order to put in my glorious tub, we needed to move the plumbing (and by we, I mean Rob and his dad - I was building the bulkheads!)
Ruger, the ass, somehow got downstairs and stepped right in the concrete as it was curing and now he's made his mark on the floor forever!
All these inside-the-walls things took MONTHS (mainly because we also have lives and the city flooded the basement which delayed us over a month) but finally this past weekend we put down the Dricore!
Tools:
- Music selection (we chose Contemporary Blues this time around)
- Hammers
- Black shims
- Wooden shims
- some 2x4s about 2 feet long
How to install it:
1. Carry it all downstairs
2. Place your first piece in the corner and shim it to make it even against both walls.
3. Dricore is tongue and groove, so you just slide the next piece into the first, shimming as you go. To make sure the new piece is flush with its sibling, you need to hit it with a hammer. But NOT on the Dricore itself! You need a buffer between so you don't damage the tongues. Put a 2x4 against the new piece and hit that (while standing on said 2x4). You may need to do it a couple times on both sides to even it up.
And if your floor is proper f*cked, like ours, you can install the Dricore to the best of your ability, then tapcon the pieces to the ground to assist in keeping it level until gravity and time do that for you. That was my job while Rob was cutting the tricky pieces. To tapcon Dricore: 1. Use a 5/8th bit to drill maybe 10mm into the top of the Dricore. Then pre-drill a hole through the Dricore into the cement. Then use an impact driver to insert the tapcon itself. Not as easy as it sounds. Especially if you break a bit and have to endure a lecture.
5. Dricore can get tricky if you have to stall it around posts but just be patient and make sure it's level!
7. Order some pizza when you're done and enjoy the look of being NEARLY THERE!
Denny was shocked at the difference!
The Dricore took us a couple full days to install - don't assume it's like throwing down that plastic crap, but using it makes a big difference, especially if you're forking out dollars for some nice flooring. I believe the Dricore cost us around $1200 for the entire stack (and we used every peice) and that's with a 15% deal at Lowe's. But, if our basement floods again, it should help prevent damage. Plus, it cushions the floor nicely so the laminate we've ordered should go on pretty nicely. And it'll help keep the floor warmer in the winter.
Tips:
- Unless you have an insane # of cuts, Dricore really is only a 2-person job because you have to do it in sequence. Don't get too many cooks in the kitchen
- Hit the hammer in the center of the 2x4 to prevent damage to the tongues
- Still wear good boots but you don't really need glasses and gloves
Next Steps: - Drywallers do their thing (so, expect a blog post in about 2 weeks for some before and after photos, as well as my exciting treatise [aka excuse] on why we hired drywallers instead of doing the work ourselves. Spoiler alert: time)
- Tina to decide on a wallpaper for the accent walls and paint for the other walls/bathroom
- Rob to agree with Tina's decisions
- Tina to find and finally purchase a freakin chandelier for the bathroom
- Tina takes a couple days off work to prime and paint! (expect a blog post for that!)
- Rob to finish building the bartop
- Tina and Rob to find the underside of the bar and/or build it (a blog for the bar itself)
- Install the lights (also for me to blog pictures of said lights)
- Tile the bathroom floor/accent wall/place where the fireplace is going (blog)
- Install the laminate (blog)
- Install Baseboards
- Put the bar, pew games table, furniture, fireplace, and lights up (final blog)
- Host New Years! :)


Things are coming along nicely! Thanks for sharing.
ReplyDelete