Basement Reno 6: All Primed Up and Ready to Paint!
Last week I took two days off work to prime and paint the basement. This was partially to get it done as quick as possible, and partially because I love painting and wanted to do it all myself. And it was an almost Herculean task to do in two days, but it was well worth it!
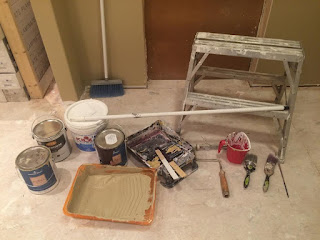
Here were my tools!
I'm assuming you know how to paint, but here are some tips anyway:
1. If you're painting a new wall, you need a couple coats of primer. Our entire basement took nearly two buckets of Kilz 2 (my preferred primer brand, and yes, because of the name)
2. If you're painting a wall with paint on it already, do a light primering. I barely did any in our stairwell because the colour was similar and the ceiling was especially clean.
3. Get one of these handy buckets! If you're going to be doing any edging at length, this thing is a life-safer. It was like 6 bucks at Benjamin Moore. It has a built-in magnet for your paintbrush so it doesn't fall too deep into the paint too!
4. Speaking of Benjamin Moore, yes that was the brand of paint I went with. Why? Because their paint goes on exceptionally well, has like a ten year fade warranty, and looks so smooth when finished. Not that Behr and CIL are bad, but I find you definitely need 3 coats with CIL and only 2 with Ben Moore. So the heftier price for the latter makes up for it with quality.
5. But if you're painting a ceiling or trim? CIL all the way baby - the cheaper the better. Because the ceiling rarely needs a touch-up, and trim always needs a touch-up regardless of the price of the paint.
6. That white stick in the photo? That screws on to the paint roller. Here's a tip - you can also just remove the handle on your typical broom and use that! Unless you break TWO of them and have to buy a new handle. Grrr.
7. If you're going to use more than one colour of paint, buy some paint tray liners (that orange tray in my photo). Not only do you some yourself the annoying job of cleaning the tray, but you also save water!
8. Edging. Some people use a weird edging tool, some people tape everything, some people use a scraper or other flat edge. Me, I go HARDCORE and do it FREEHAND. I've painted so many damn rooms that I actually enjoy edging. And yeah, tape for me is only used to tape the paintbrush to a stick in order to get to the top corners of the stairwell.
9. Entertainment. While painting I like to have a movie on the background. I find I actually work longer because I take short minute or two breaks to watch an exciting scene instead of taking a bunch of 15 minutes breaks to go upstairs or whatever. What did I watch these two days? Started with Bride & Prejudice which is full of awesome music. Then I watched Mona Lisa Smile because I wanted something mellow and I figured I wouldn't need to actually WATCH it since it didn't seem like it would be an action movie (not a bad movie, overall. Kind of goes off in the wrong direction at the end). Then I started in on the Harry Potters. Got through 3, 4, 5 and 6! Ginny in the book is so much better than Ginny in the movie, I must add.
Anyway, here are some photos!
It's not actually green back there. The florescent light we have in there currently makes it go that colour in photos.
BAM!!! (The back wall here will be tile)
I realize I forgot the stairwell. Oh well.
Next steps! This weekend we're TILING!!!!!!
Bonus!
We also finished the electrical this weekend, so here is one of our USB plugs. No longer will I have to bring a charger to the basement to replenish my phone!
Bonus 2! Somehow this photo snuck into my files. So, here were the amazing Duck Confit & Waffles I had at the Baker St. restaurant in Guelph last weekend.


Comments
Post a Comment