En... not so sweet
Since the last post we’ve had a few Saturdays of working in
cramped quarters, where some tempers have flared due to, well, working in
cramped quarters. But, we finally have all the “guts” finished, so we can move
on to the fun stuff! But first, we did make some modifications! We didn’t do
all of this in the order I’m listed here, as some things had to be done to get
other parts of the job moving, but it’s easier to describe in chunks.
After demoing the shower itself, we had to take down the
walls and the cement board in the ceiling. This
took longer than anticipated as the pieces of wood on to the joists in the ceiling
were a) attached with 9000 nails and b) rather finicky to remove, as we couldn’t
risk pulling down any of the vapor barrier and having a ton of attic insulation
fall on our heads.


After that, as Rob started tearing up the floor I started
removing the old insulation and re-insulating with the good stuff. The reason we
were doing this was to see if there was any water behind the wall and the
bathroom tended to be chilly, so we wanted to see if we could figure out
way. We did discover that there were some
gaps in the floor joists where the bathroom juts over our porch that were
pretty much open to the elements. I filled those with Great Stuff.
 |
| You can see the Great Stuff foam in the gap between the joists on the left. As it was drying I put a small piece of insulation over it and then wrapped with vapor barrier. |
This flooring was very annoying to remove. The previous
owners merely slapped old floor over top of more old flooring so there were 3 pieces
of old particle board adhered together that we had to use the circular saw and
sawzall to remove. And they were HEAVY.
Tearing up the floor was very important for this job because
the bathroom had always smelled musty, plus, there was a disconcerting stain
growing downstairs above my chrome T-Rex head.

We discovered the reason for the discoloration… when we
removed the toilet, we found the previous owners did not screw the toilet down,
but merely used caulking. Over time this caulking wore away and the toilet started
to leak… below the floor line onto the drywall below.
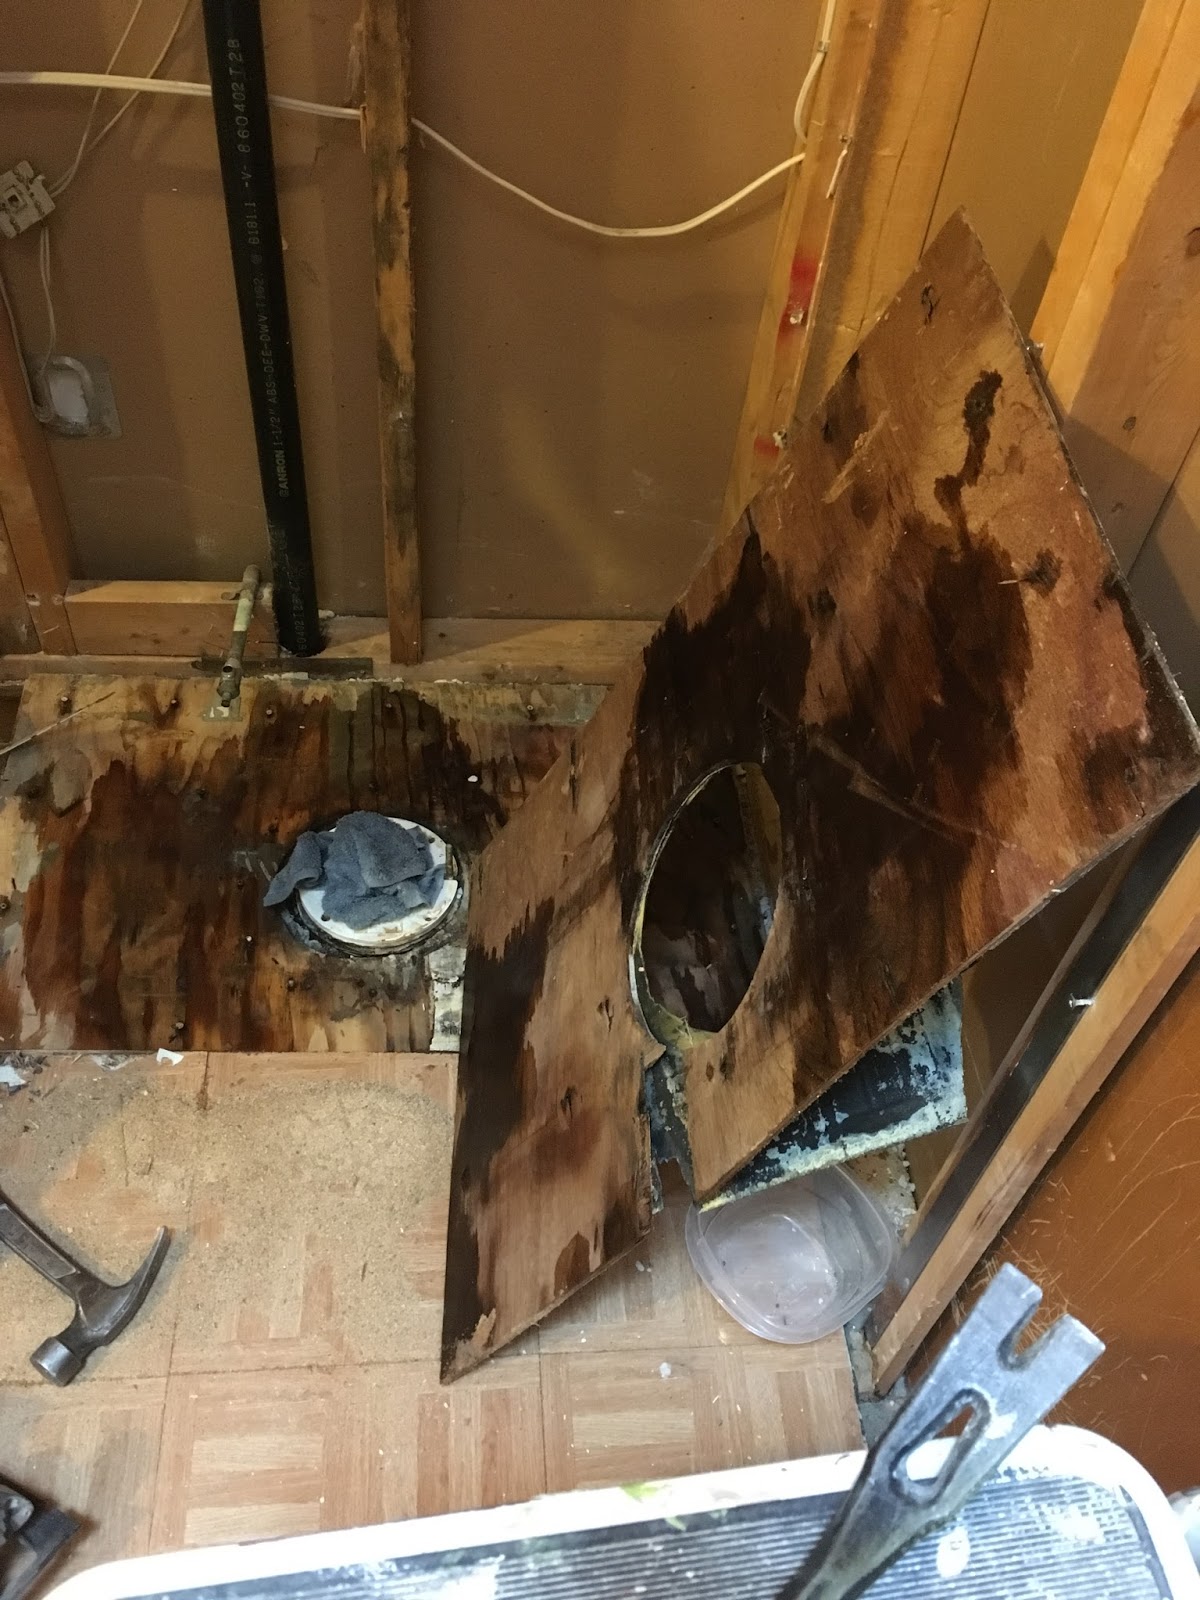
Yeah, all that dark stain is water. TOILET water.
I got the pleasant job of scraping away the old caulking from
the toilet seal. As kinda gross as that was, it’s important to make sure when
we re-installed the toilet, it’s done PROPERLY.

Also – it’s annoying as hell not to have a floor! You can’t
step between the joists because then you’ll fall through the drywall into the
floor below, but the joists are hard, just too slender to sit on with your butt
for more than a minute, and we were wearing steel toed shoes that aren’t designed
for balance beam acts. So we made an island out of an old piece of the flooring!
 |
| My island of hammer and drill |
The Electrical we also redid. Originally the washroom had a
fan (luckily!), a vanity light that was part of the medicine cabinet, and a dull
light in the shower. We discovered that while the previous owners did have the
proper water protection around the shower light fixture, they used duct tape instead
of tuck tape to fix the vapor barrier they ripped. Sigh.
 |
| At least they tried |
We decided to leave the vanity where it was and just replace
the shower light with a new one, but we had two other electrical tasks.
1
1. Replace the fan with a new one. This was all Rob. Not only is he an
electrician but the attic… I went up, saw a spiderweb and nearly fell off the
ladder. Scrape possibly poopy caulk from a toilet drain? Sure, not problem. Cobweb from a probably dead spider? Nope. Nope.
NOPE.
So Rob used the drywall saw to widen the box for the fan and
then installed the new one.
 |
| Fans in bathrooms with showers/baths are VERY important |
2 2. We also wanted to add a pot light over the
toilet for more lighting in the room (plus easier reading! haha). As Rob ran Romex
from the vanity fixture to our proposed new one I measured from where the new
shower doors would end and the wall to find the center of that, then found the
center from the wall to the door opening. Then I did the important job of stabbing a screwdriver into
the middle for Rob to find.

 |
| Yay! A fan to mask pooping and a light to help make it fun! |
There were also some small things we had to do. The vent for
the room was old and crappy so we replaced it with a new one (which was a bigger
pain than we expected, because the previous owners had MANGLED the opening of the
vent) and we also moved the sink pipes a little so we could have a floating
vanity. We also moved the shower piping from the floor area (it had previously
run up the shower wall) to the wall for my rainfall showerhead!
But, before we could finish the piping, we had to put the
floor back. This wasn’t all that bad as
the room was pretty square and the joists were fairly level. So as Rob did the
aforementioned plumbing I measured and cut some 2x3s to screw to the joists so
we could use them as something to screw the new floor into on the edges. I don’t
have any photos of that, but here is the room with nice, new non-shitty floor.
 |
| No poopy water to be found! |
 |
| Dude is a PRO |
We also had a funny moment where we realized Rob and I didn’t
label which pipe was hot and which was cold, so we had to attach the new sink faucet
to one of the lines to see which was which!

After the plumbing was done, while Rob was doing electrical,
I wrapped and strapped said piping. The main reason for doing this isn’t to
help with heat retention, but to prevent the pipes from rattling against the
wood when water is running through them. So there they are, nice and snug!

The last thing we did before calling it a day (or a month
and a half) was to put drywall in the ceiling hole. We aren’t tiling the
ceiling so we first had to nail some thin pieces of plywood to the joists to
make the drywall flush with the rest of the ceiling drywall (cement board, which
was there before, is ¼” thicker than drywall). Then we had to cut the oddball shape
(which, because it was the end of the day we messed up slightly and got in a
fight) and adhered it. Then Rob put up a piece of cement board for fun while I
tidied up.

Next Steps! Finish cement boarding and drywalling! Mud and sand. Paint the ceiling. Tile! Paint the walls (might come bfore the tile). Purchase a vanity and vanity light.
Hints:
1. If you are tearing up a floor, save a piece to use as an island!
2. Wrap plumbing pipes in insulation to keep them from rattling
3. Make sure to properly install your toilet
4. If you are going to tile in any areas subjected to high moisture or water use cement board!

Comments
Post a Comment