Blinded by the (terribly ugly) light(s in our house)
With chagrin I noticed that this blog was last updated in November. This was partially an intentional decision and partially laziness, but either way, there are no basement photos to show, because pretty much everything that was done (and there was a helluva lot done) was all just the guts (plumbing, electrical, gas line, chipping the floor, lots and lots more electrical). I was going to do a post about how to build a wall, but was just too busy, so I apologize. If I find a spare moment at the end of the reno I'll create an Appendix or something.
But, this post isn't about the basement. Because, lucky us, a city water main burst and sent gallons and gallons of water into the basement right as we were installing the Drycore (which I am going to do a blog about, as I love Drycore), so the basement in on hold until the city process our claim for damages. So, expect something in like 2025, or perhaps when hell freezes over?
So, this weekend, with the aptly named Labour Day holiday today, Rob and I did a bunch of fiddly stuff around the house. We patched the corners of our walls where Ruger had gnawed them (thanks dog), I painted a whole bunch of stuff (re-painted our fireplace to cover the knots, our ensuite door is now the colour of the walls, touched-up the hallway and some trim), we installed new vent covers (exciting times), Rob installed new Nest smoke detectors (fancy!), and today Rob finally added the cover plates to the backsplash outlets (he had to use his dremel tool on the stone to grind off the edges of the ledgestone so they would fit), and I re-purposed some lights. Which is what this post is about!
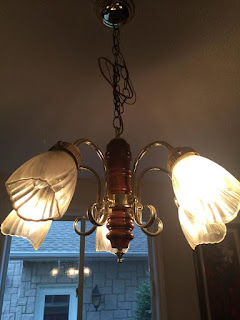
Some background. Our house was born in 1983. All its light fixtures except for the kitchen light are from ... 1983. Hideous. The worst light is our pepper grinder "chandelier" in the dining room. No, I didn't repurpose this filthy thing (when it goes, I'm smashing it - no one deserves that in their house).
What I revitalized were these hallway lights:
Due to the basement we don't have the time or money to mess around replacing these with new fixtures or pot lights, plus Rob and I are constantly arguing about what kind of light to get, so we decided to simply modernize the fixtures we have! And if you also have ugly old lights in your house, here's how breath some more life into them! And it only costs TEN DOLLARS.
1. Take down the lights (if you're not an electrician, please flip off the breaker before you do so)
2. Use soap and water to clean them (takes like ten minutes)
3. Rub anything you are spray painting with steel wool or this handy pad (scotch brite) Rob had in the garage. This roughens up the surface to allow the paint to adhere. Took me about half an hour.
4. Make sure you don't paint on any threads or on the element - so tape where needed.
5. Get some paint intended for metal
6. Set down newspapers in a ventilated area (or not, if you enjoy paint fumes) and then spray evenly.
7. Do another coat if needed (my paint was good for coat 2 in about 45 minutes)
8. Then put it together ...
And back up!
And there you go! Not an amazing change, but now I don't vomit whenever I walk down my hallway.


Comments
Post a Comment